Sunday, June 12, 2022

My Introduction to Nature Journaling

Recently, I came across the concept of nature journaling and have fallen in love with it.  I have found it to be extremely relaxing and doable.  My journal has relatively small pages (7"x9"), so I am limited with the size my illustrations can be.  I have found it super simple to do, because I follow John Muir Laws' process of including 3 fundamental elements on each page: 1) I Notice, 2) I Wonder, and 3) It reminds me of.  Following this process really helps me to hone in on what I am going to focus on.  I don't have to cover everything.  This has really freed up my curiosity and creativity.  Here are my first two entries along with photos I took from my exploration:


Thursday, December 30, 2021

Thank You Cards


Hello! Hello!

A couple of weeks ago, I had a hysterectomy.  One week later- to the day- I ended up in the ER and then the hospital with a bowel obstruction.  Then, exactly one week later, I wasn't feeling so well and ended up visiting my family physician.

Although I would rather not have had any of these experiences ;), I have been extremely grateful for the amazing care I have received from all of my caregivers.

Earlier this week, I watched Gina K. Design's Stamp & Chat recorded live stream featuring the background masking technique I used here. 

Since my body is healing from a few things, I have worked on these cards in little spurts.  I finally finished them this morning and love the way they turned out!

I even made custom envelopes to send these in.

Hope you have a great day!

:) Dari

Tuesday, December 21, 2021

Christmas Nativity Bookmarks to Color


I drew these bookmarks to give as neighbor gifts for Christmas.  If you would like, you are free to download and print your own for personal use or to also give as gifts.  Printable PDF Version.

The true reason for the season is Christ.  Christmas means more of Christ (más is from Latin/Spanish meaning more).

Merry Christmas!

Friday, November 26, 2021

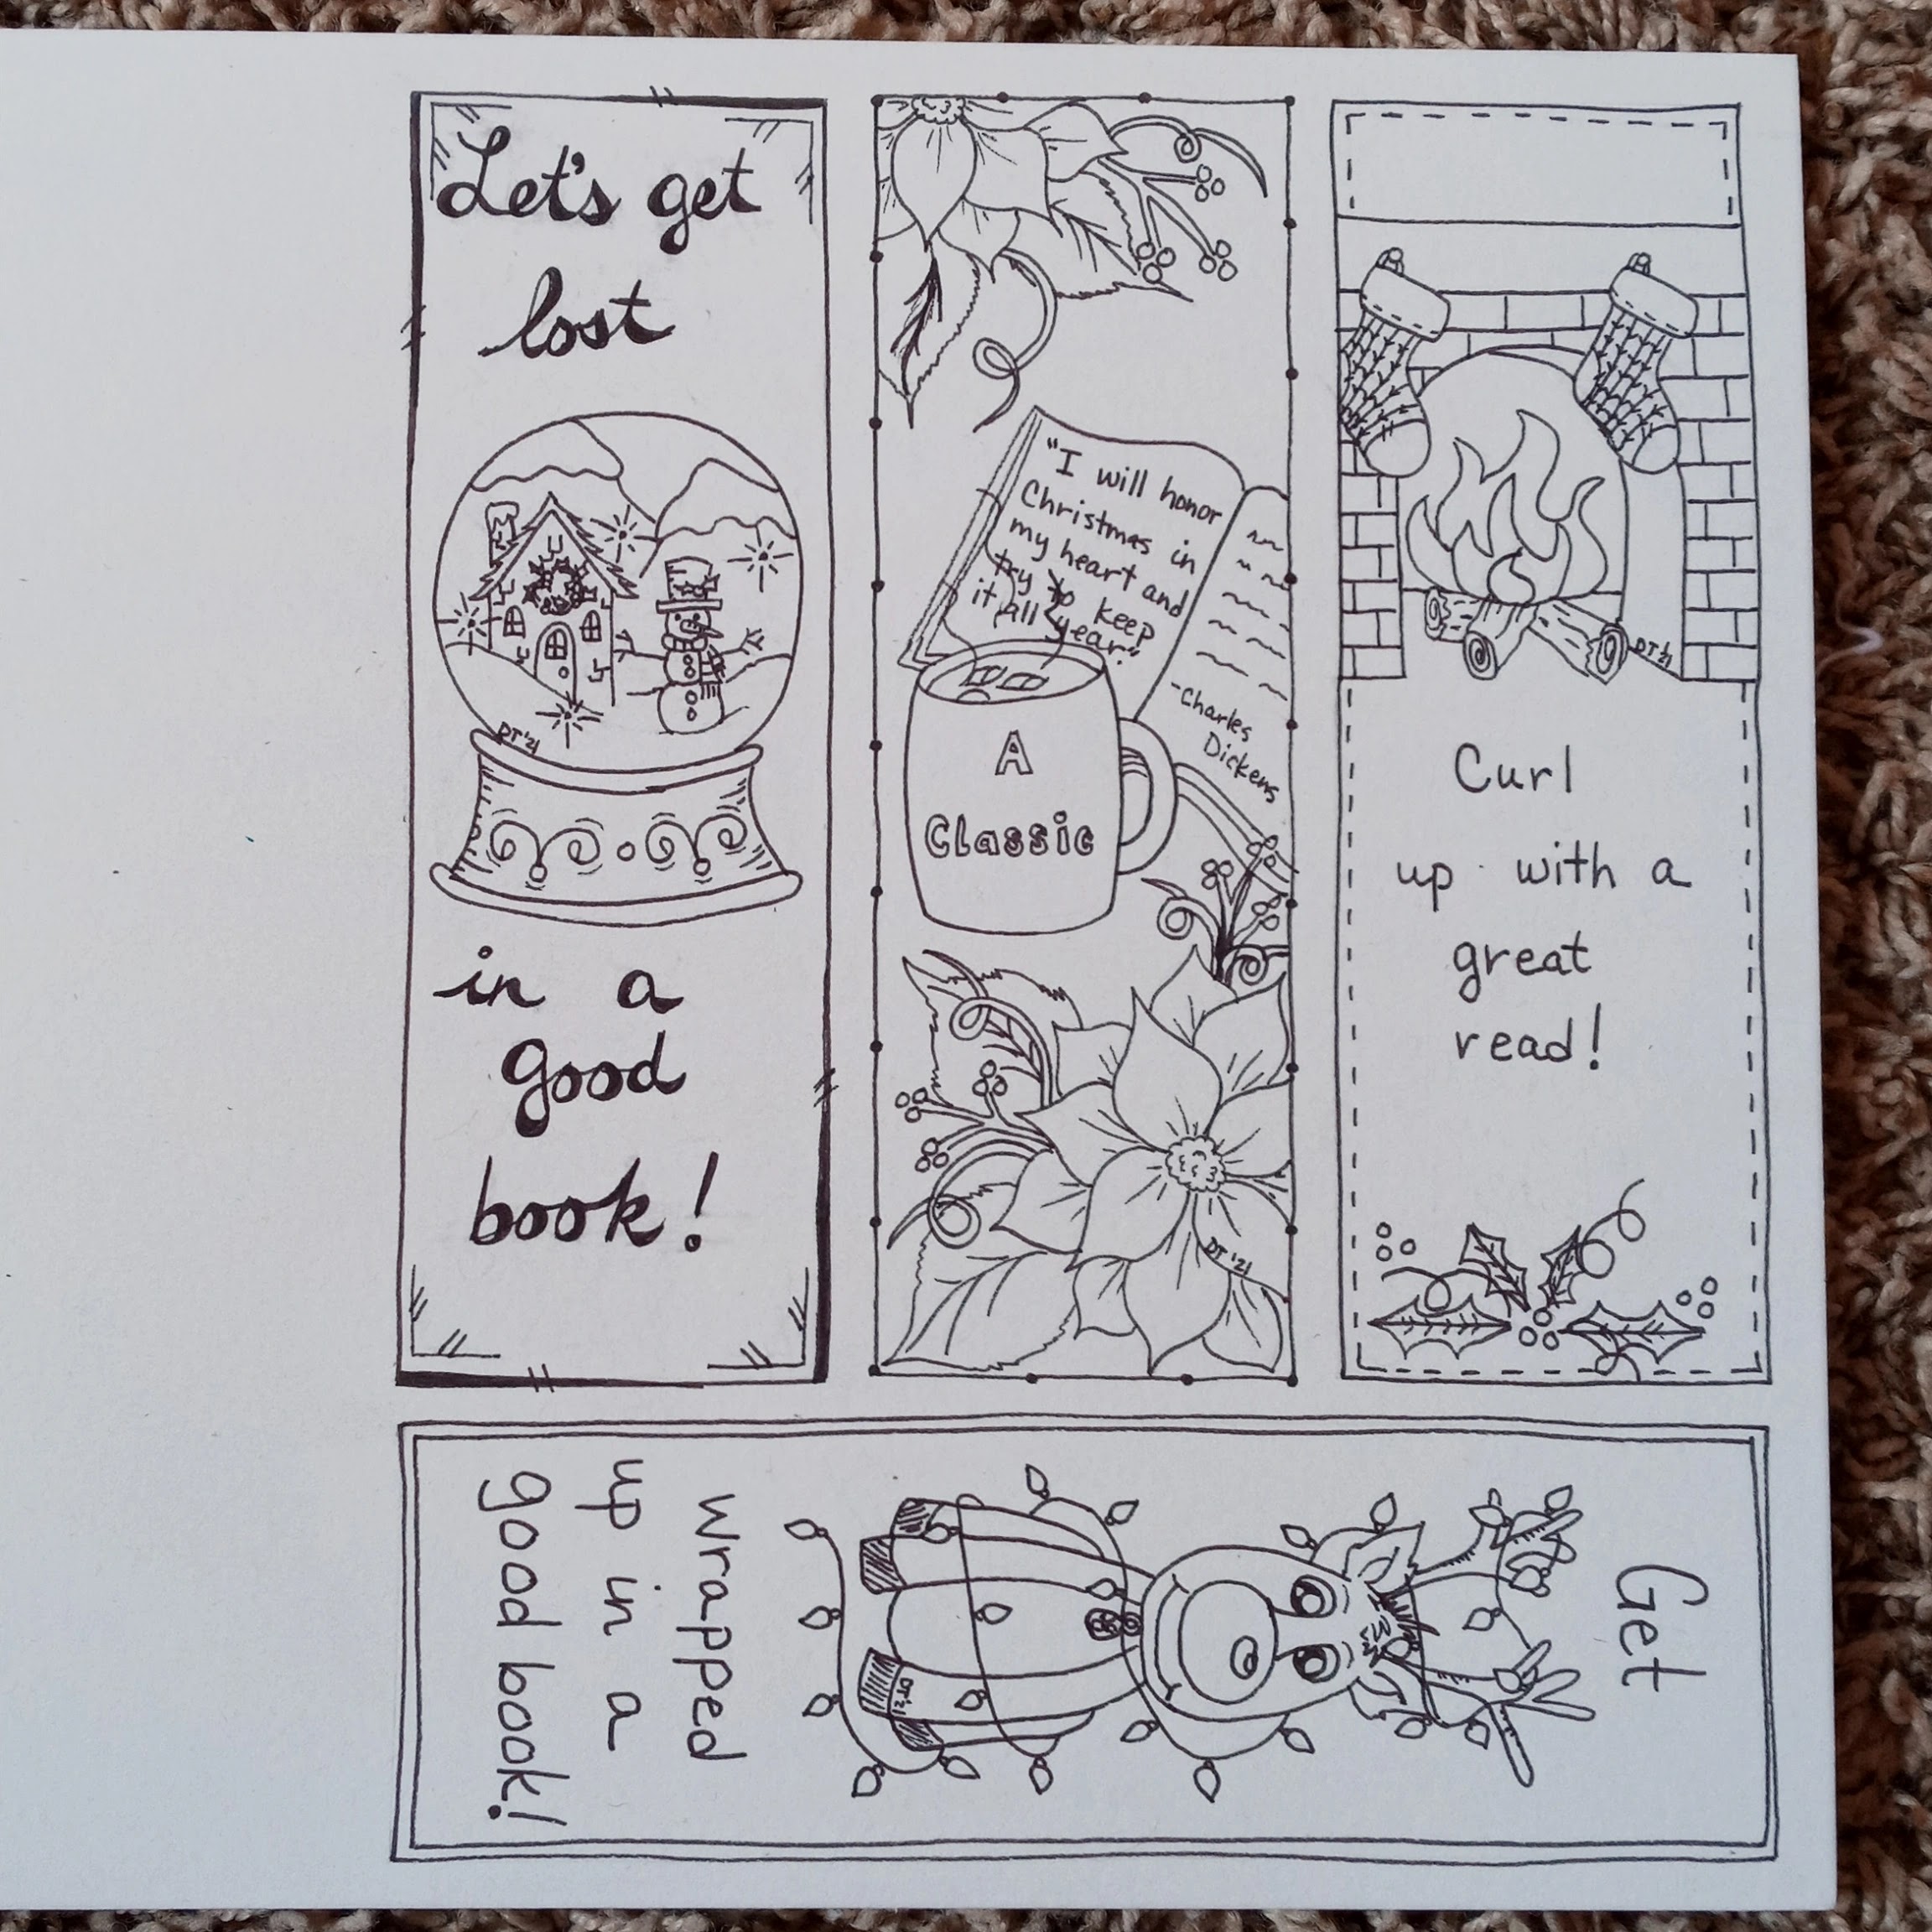
Christmas Bookmarks to Color


After our Thanksgiving dinner yesterday, I decided to create some bookmarks for Christmas.  I plan on placing one of these in each of my students' books I am giving them for Christmas.  These reflect some of my thoughts and feelings towards reading during this season.  

Feel free to download your own to color for personal use.  Or, maybe it will give you some inspiration for your own creation :).

Christmas Bookmarks

Have a wonderful day!

Saturday, November 6, 2021

2 Artist Trading Cards: John Howard Bawden & Mette Kathrina Pedersen

 I have been creating little ATC's (Artist Trading Cards) featuring some of my ancestors.  I began thinking about this idea a month ago and decided to create cards for my direct ancestors who have birthdays in the month of October.  

As it seems with most everything in this season, I have not had the strength, energy and/or time to hunker down and bring this idea to fruition.  Last Sunday, the last day of October, I was finally able to start.  I completed an ATC for my 2nd great-grandfather, John Howard Bawden. He is my mother's mother's grandfather.


Later this week, I began an ATC for my 2nd great-grandmother, Mette Kathrina Pedersen.  She is my father's father's grandmother.  I was not able to finish this in a single sitting.  However, I really felt the creative "itch" this morning.  I am tickled with the way it turned out, and I think I might be able to convince myself to tackle some of the "have-to's" for the day now :).


Although these look really large in the photos, they measure 2.5"x3.5" in accordance with ATC standard sizing. My current thoughts are to put all of these finished cards onto a 2-page scrapbook layout.  Who knows? I may create some for all of my first 6 generations (where photos exist).

I have 4 more to go.  Hopefully, it won't take me another month before I get one done!


Friday, June 18, 2021

Tyler's Graduation Layout


It's crazy to think that my second child just graduated from high school.  I remember many days desperately watching the clock for the anticipated arrival of "daddy" from work, so I could have a "mommy" break.  My two boys are grown.  How exciting for them and for us.

I chose to do this layout in blues and greens, because his favorite color is dark blue, and his high school colors are green, black and white.

I only used cardstock as my paper resource.  To create the printed backgrounds, I used shimmer mists and color sprays.  The tag/flag stamps are all from Close to My Heart.  The accent embellishment stamps are also from Close to My Heart.  The thread like stamp is from Stampin Up.  I embossed these thread circles as well as the "Bravo" sentiment.

On a side note, I used Adobe Spark to create his graduation announcement (left side).  I have the free version.  It is so fun to work with and produces professional results!

Saturday, November 28, 2020

Elegant Birthday & Thank You Cards


November is a busy month in our family for birthdays.  All three of my sisters' birthdays as well as my own fall in this month.  Then, one of my sister-in-law's birthday is in November along with my mother-in-law's.  

I had some time this week, so I put my creative juices to work.  For my birthday, my husband gave me some new stamps, embossing folder and some cutting dies.  I love how these cards came together.

Supplies used for these cards:

* Cardstock (from Michaels- Reflections)
* Inks from Close to My Heart: Desert Sand, Saddle, Cocoa and Grey Flannel
* Old World Paper 3D Embossing Folder (Stampin' Up)
* Butterfly Beauty Dies (Stampin' Up)
* Ornate Layers Dies (Stampin' Up)
* Your Own Kind of Wonderful Stamp Set (Close to My Heart)
* Feels Like Home-Scrapbooking Stamp Set (Close to My Heart)
* Love so Sweet Stamp Set (Close to My Heart)
* Beauty Abounds Stamp Set (Stampin' Up)
* Comfort and Hope Stamp Set (Stampin' Up)


The Guys: Game Time


I have not had any time to scrapbook for awhile.  I can't imagine why ;).  Work responsibilities have definitely occupied a lot of my time.  Teaching has never been a 9 to 5 job.  This year has not lessened that load.  

Anyway, I did not feel well over the weekend.  And, given the circumstances of the society we live in right now, I had to go get tested.  I thought I had Strep.  Of course, I had to get tested for COVID at the same time.  They did rapid tests for both of these; however, they both came back negative.  So... they took another culture for both of these and told me I had to quarantine until 24 hours after my symptoms subsided AND my other test results came back negative.  

Well, yesterday I began to feel better.  However, my test results aren't back yet, so I could not return to work today.  I actually have mental energy and have reached the point of being sick of being in bed.  Thus, I pulled out my scrapbooking supplies and created this layout.  What's more is that this photo isn't two or three years old... or older ;).

I am very happy with the results, and my son was, too, because he took a photo of the finished page with his phone.

This was created with a variety of supplies and brands.  The inks are from CTMH as are all of the stamps.  The die cut is from Stampin' Up.  The papers are from my stash.  They were in a paper pack I picked up from Michaels about 4 years ago.  


Monday, August 10, 2020

Mask Shield With Removable Plastic


Hello! Hello!

So, I have loved wearing my mask shields.  OK, honestly, I would rather not have to wear anything on my face- make up included; however, these are so much better than masks or shields.  That being said, I wore one out.  I think it is the one in the post for the original tutorial ;).  

Anyway, I didn't want to have to get rid of my mask shields just because the plastic became really worn.  So, I decided to NOT sew the plastic piece into the mask.  Instead, I sewed 4 buttons onto the mask and then cut slits into the plastic that aligned with the buttons.  This way, when the plastic wears out, I can simply cut a new piece out and reattach.  It worked perfectly!

I attached the two end buttons about 1/2" from the seam binding and the other two buttons about 1/2" from the center pleats.  The mask and shield work just as great as before!


If you are looking for the pattern and video tutorial, click here :).

Sunday, August 2, 2020

Can Achieve When Believe

You Can Achieve When You Believe


I FINALLY scrapbooked our family photo at my graduation from WGU in the Spring of 2017.  I know that is a little ways back there :).  I went back to finishing my degree in 2016.  It was INTENSE.  I truly felt that I was inspired and directed to finish at that time.  However, I didn't just feel the prompting and push to finish.  I felt the push that I needed to finish as soon as possible.  When I enrolled at WGU, I asked them if they thought it was possible to finish in 18 months.  The answer was an absolute no.  Somehow, though, I felt like that was the time frame I needed to complete my education in.  I sat down and mapped out how many credits I would need to complete in a semester.  Then, I broke it down further and figured out that I would need to complete each course in 2.5 weeks.  To help me stay focused, I printed out a little sign that said, "You CAN achieve when you BELIEVE."   

For 12 months, I slept, ate and did school.  Oh.  That's not true.  I also continued subbing for the school district in all of the schools K-12 and volunteering once a week in my daughter's classroom for 3 hours every time.  

Then, if that wasn't enough, one week before school started in 2016, the elementary principal asked me if I would be willing to start the year out for the English 4th grade dual immersion teacher.  She had just had an accident on her lawn mower and got a major concussion.  I said, "Sure."  I set up her classroom, met with her and went over the routines and procedures she wanted the students to learn.  That week turned into 4 months teaching full-time.  I had three weeks right before Christmas break when I only taught half-days, so I could finish my clinicals.  Then, on the first day back from Christmas break, I returned to that classroom and the Spanish cohort side.  I taught the first half of the day in Spanish and the second half of the day in English.  By this time, these two teachers knew me really well and just had me take charge of all the learning while I was in class.  I was also called as my ward's Primary President.  We had a rather large Primary.  I was over 110 children ages 18 months to 11 years old and 46 different leaders.  

Despite everything, I was ABLE to finish in 18 months.  I referred back to my little sign every day.  I deliberately capitalized CAN and BELIEVE, because it helped me to believe in myself when it was really hard.  We CAN BELIEVE, and when we really do, there is nothing that can stop us for reaching our goals.  

So much has happened since then.  Immediately after graduating, I was hired on as a K-5 elementary teacher and started a brand new blended learning STEAM elementary school.  That first year I taught grades 3-5 on Monday and Wednesday and grades K-2 on Tuesday and Thursday.  On Fridays, we had different activities, and I taught Spanish to students in K-5.  The staff consisted of myself and the principal.  Between the two of us, we did everything- admin, recess duty, instruction, interventions, secretarial and janitorial duties.  

That was 3 years ago.  Now, we are weathering through COVID-19; however, this feels like nothing compared to the three years before.  In fact, I feel that things went really well for me and my students this past Spring.  Looking towards this next year, I am not afraid or overwhelmed that I will have students in 2 grades attending M-TH in class; 100% remotely; 50% in class and 50% remotely; 3 days in class; and M-TH half days.  

All products used in this scrapbook page are from Close to My Heart or Stampin' Up except for the gold flourish stickers and dark blue cardstock. 

Wednesday, July 22, 2020

Mask Shield Pattern


Hello! Hello!

It has been a very long time since I posted.  Life has been very busy over the past few years.  I am an elementary teacher and am preparing to go back to school this fall.  Of course, due to a 5-letter 2-digit word that I would rather not say ;), I will be adding something new to my daily apparel.

I cannot stand the masks.  I can't breathe out of them.  They fog up my glasses, and honestly, they are difficult to hear people when they speak while wearing them.  Originally, I thought I would just get a shield.  However, when I put my cute shield hat on, the view was so distorted I thought I was going to puke from dizziness.  I could breathe easier, and others could hear me and even see my smile and lips moving.

So, I spent a while designing and creating my solution to all of these issues.  The end result is what I call a mask shield.  It has a contour shape that hugs close to the face.  With the addition of a pipe cleaner, it fits snug enough that my glasses do not fog up.  I can breathe.  Others can hear me, and my students will be able to read my facial expressions and lips when I smile and speak.

Today, I would like to share this with you.  There are three sizes (S, M, L).  The Small fits youth (10-13 as well as a woman's small).  The Medium fits teens as well as many women's faces.  And, the large fits men's larger faces well.

You are welcome to create these for your own personal use or to give away.  You are not welcome to sell your finished products created from my pattern.  If you would like to do so, contact me, and we can discuss this.

Note: On the Medium and Large patterns, I did not put elastic sizes.  Each person's ears are different, and so I have not found the perfect elastic length.  Below are my guidelines.  I recommend cutting your elastic at that size and then adjusting accordingly, so that the finished product fits the wearer just right :).

Small: Two pieces 6.5" of 1/4" elastic
Medium: Two pieces 7" of 1/4" elastic
Large: Two pieces 8" of 1/4" elastic

Mask Shield Pattern

You can also watch tutorials here:

Mask Shield Tutorial Part 1


Mask Shield Tutorial Part 2


Wishing you a wonderful day!

:) Dari


Monday, April 3, 2017

April General Conference 2017 Brag Tags


Hello! Hello!  It has been a VERY long time since I posted anything.  Not that I haven't wanted to, but I have been in over my head with work and school.  I just finished my teaching 
degree :)!  

The past two days have been wonderful for me.  In my church, The Church of Jesus Christ of Latter-Day Saints, we have a semi-annual General Conference the first weekend in April and October.  My kids love it, because we get to enjoy church from our own living room, and they can stay in their pajamas all day if they want to.  I love it, too, but for different reasons.  I love the inspiration and motivation I receive from the messages.  It is a great lifter-upper.  I always come away feeling like my spiritual cup is overflowing.  The Spirit always teaches me things that pertain to my own life and what I can do.

As I was listening to each speaker and taking notes, I decided to create a little brag tag for each one.  I am not exactly sure how I will really use them :), but I have some ideas of how I'd like to.  I think they would be a great Family Home Evening review activity.  Or, they could be made into a memory match game (just blow them up a little!).  Also, I would really like to use them in Primary- that's the organization in our church for children.  I am currently serving as the president of our ward's Primary. A week ago, I gave each child a "General Conference Report" to do over conference and told them if they brought it back on Apr. 9th, I would give them a cookie.  I want to display all of their reports on the back wall for a little while.  I thought adding the brag tag that correlates with their report would be a fun little addition.  I haven't quite figured out what I will use to hang them from.  If you have any ideas, I would love to hear them :).

You are free to use these for your own personal use.  Of course, they may not be sold or modified in any way, with the exception of the three blank tags.  I included them so you could create one of your own about your favorite talk.  If you do use them, I would love to know how you chose to :).

Thanks for stopping by!  Wishing you a wonderful day :)

-Dari


Tuesday, July 12, 2016

4th Grade Soil Profile lesson plan, Clue 3-2-1, and Edible Soil Profiles!

EDIBLE SOIL PROFILE!


Hello! Hello! Everyone,

I know it has been an extremely long time since I have posted.  I have been extremely busy.  By August 1st, I will have completed 39 credits in 6 months.  It has been a wonderful journey of growth and learning.  I have learned that I can put on blinders and not go crazy from a house that is not clean to my standards.  I have learned that if I give my family the opportunity (and enough time), they will pick up the pieces.  I have always just done everything.  In a way, I have enabled them to not learn to do those things.  I have also learned that I can do hard things, that I am not a quitter, and that I am capable of achieving my goals. 

For the last class I completed, I had to create a 4th grade science lesson based on my state's science standards.  I am excited about how it turned out and wanted to share it with you.  Of course, being me, I like hands-on activities and do not like being bored, so this lesson plan has lots of opportunities for involvement and different ways to engage students. 

In this lesson, I have created a Power Point Presentation, a vocabulary game called Clue 3-2-1, a graphic organizer, and a hands-on edible soil profile activity.  I have also included a Plickers quick assessment. 

You are free to use any of these resources as long as you leave them intact as is and do not use for monetary gain. 

Hope you enjoy!!

Thanks for stopping by :)  -Dari

Monday, January 4, 2016

CTMH Sangria Family photo layout


Hello! Hello!

I am in love with this layout :).  It came together quite easily, and I love how all of the elements add to it.  I created this with CTMH's Sangria paper packet, CTMH's Blushed embellishments, black paper, white glitter cardstock, and three different CTMH stamp sets (all past Stamp of the Month sets).  

I haven't posted in a while, and I probably won't post frequently for awhile.  I am no longer a CTMH consultant, because I am starting school soon and can't put forth the energy/time needed to be successful in both endeavors.

I have a year and a half left before I will have my teaching degree.  I want to teach in the Dual Immersion Program.  Wish me luck!

Thanks for stopping by!  I hope I have inspired you today :) -Dari

Saturday, December 12, 2015

Twelve Days Before Christmas Explosion Box


Hello! Hello!  It has been a very long time since I posted last.  As I mentioned earlier, a lot has happened in my life the last few months.  I began substitute teaching in the fall.  There are only two of us substitutes who speak Spanish, and I also have a lot of experience in music, so I have been requested a lot.  That's nice, but it has seriously cut into my crafting time. 

I have also realized how much I love being in the classroom and have decided to go back and finish my teaching degree.  I began this eons ago (before my children came along).  My goal is to teach in the Dual Immersion program.  I have been busy getting everything ready so I can start soon. 

With that said, I don't think my crafting time is going to pick up in the next little while.  That's ok.  There are different seasons for different things in our lives

Anyway, in October, I had this awesome idea to make an explosion box that would be an advent calendar of sorts; however, I wanted it to have some meaning to it and not just "Day 1" etc...  It took awhile to work out all the details and to formulate my designs for this project. 

I decided to use some well known Christmas icons as my focus. There are 12 pockets with a unique icon on a tag.  On the backside of the tag, there is a message that correlates with that symbol.  I didn't want these to be "fluff," but rather wanted them to help focus our thoughts more on the true meaning of Christmas- Christ. 

Here are the symbols I chose and their corresponding days:

12- Gift:
Christmas is a time of gifts.  Gifts given and gifts received.  Some can be bought with money, some cannot. Think about a gift you could give that would not require money.  Do it.  (Simple as visiting a widow, calling an estranged sibling, writing a letter to someone.)

11- Wreath:

Symbolizes forever, never ending.  Because of our Savior, Jesus Christ, this life is not the end.  Our future is as beautiful as we make it.  If we seek God and take full advantage of His Atonement, the luster of our lives (evergreen) will never fade.

10-Star:
is a symbol of direction.  Today, people use this star to help them stay oriented.  What can we do to keep our eyes on the Savior?  

9-Candle:
His light will lead us safely home.  He is the light/our example.  How can I be more like Jesus? Or, what can I do to be better prepared spiritually for His coming? To have my lamp lit?  

8-Donkey:
Journey of Mary and Joseph- Each of us is on our own spiritual journey.  It is not easy or quick.  Sometimes we get waylaid or set back. Our conversion is the journey we are undertaking.  We will never be through until we die.  It takes constant effort.  

7-Angel:
He brought “Glad Tidings,” which is the gospel.  How can I be a better missionary?  Is the gospel “still blessing me and my family with peace and joy as promised?” If not, what can I do to change that?  

6- Wise Men:
They were men of great understanding. They studied not only science and astronomy, but understood the scriptures and the prophecies as well. They were well versed in temporal and spiritual knowledge. In my life, what area would the Lord have me focus on gaining greater “wisdom”?  

5-Shepherds:

When they heard the good news, they “ran with haste.”  They didn’t wait.  How can I follow their example?  

4-Mary:
 Mary was pure and clean; was willing to submit to God’s will for her; believed in God’s power and in the personal revelation given to her by the angel Gabriel.  She trusted in Him and did not fear. How can I be more like her?
Mary was pure and clean; was willing to submit to God’s will for her; believed in God’s power and in the personal revelation given to her by the angel Gabriel.  She trusted in Him and did not fear. How can I be more like her?

3-Joseph:

Joseph had a hard decision to make.  He took it to the Lord and listened to His answer.  He didn’t second guess the answer or think more of “how this will make me look in the eyes of man.”  He chose to be the father figure for the Savior here on this earth. He took it upon himself to live his life in the service of God

2-Lamb:

The lamb the Jews sacrificed each year during Passover was symbolic of the sacrifice Jesus Christ made for us.  He was The Lamb.  Because of Him, spiritual death can “pass over” us IF we listen to and keep His commandments.

1-Baby Jesus:
God so loved us that He gave His Only Begotten Son.” The greatest gift that has been given is Jesus Christ.  He is the reason for the season.  What will be my gift to Him this next year?  


I used the following products to create this project:

CTMH White Pines Paper Pack
CTMH White Daisy cardstock
CTMH Damask embossing folder
CTMH Diamond embossing folder
CTMH Cricut Artbooking Cartridge
CTMH Reason for the Season stamp set (D1614)- most of the images/sentiments
CTMH SOTM stamp set (S1407)- numbers for days
CTMH Sing Glory stamp set (C1587)- angel
CTMH Blossoms Cardmaking Workshop stamp set (D1649)- candle
CTMH Happy Hello stamp set (S1502)- wreath and image on top of box 
CTMH dye inks: fern, black, pomegranate 
CTMH bonding glue pen
CTMH 3D foam tape
unbleached kitchen cotton twine
Glitter white paper strips (5/8" wide)

I would love to hear what you think about this project.  I will reply to all comments; however, I am not checking my blog every day like I used to, so it may take a little while :).

Wishing you a wonderful holiday!! Merry Christmas- Dari